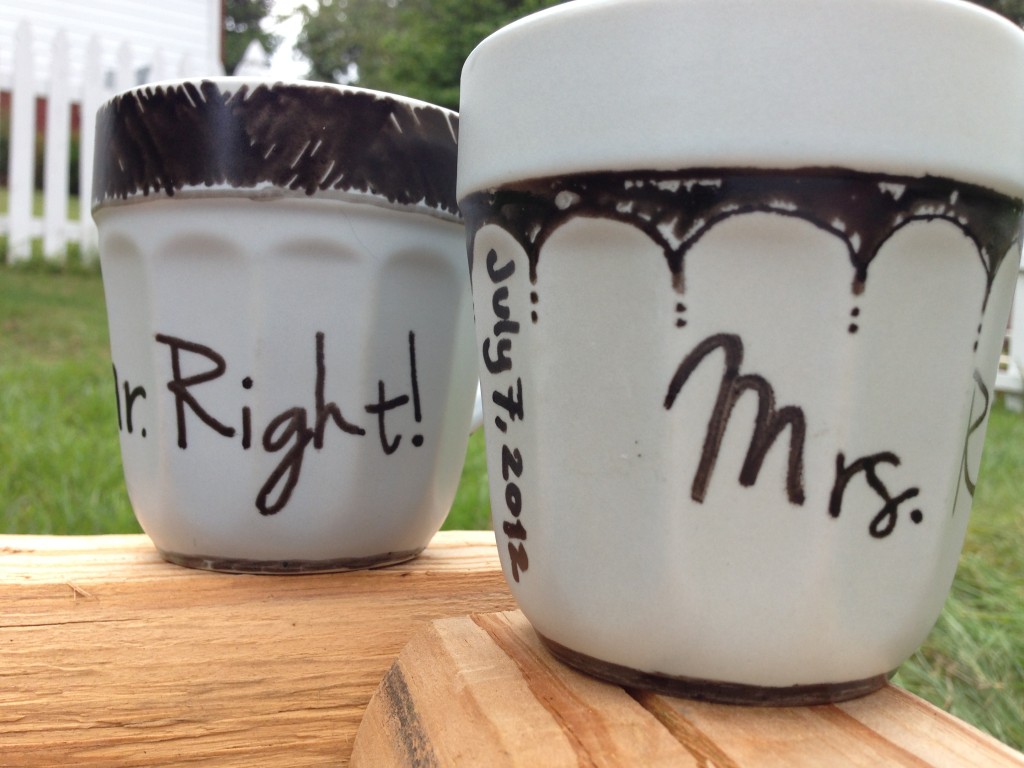
Looking for a fun and easy craft project? Or maybe a less expensive gift idea for the coming holidays? I recently decided to try a fun (and very easy) DIY project. I saw an article here for completing these quirky, monogrammed mugs. My husband and I decided not to exchange 1-year anniversary presents. I thought making a few of these DIY decorated mugs using one of our wedding stationary fonts would be a creative and inexpensive way to make 1-year anniversary mementos 🙂
I followed the general directions provided by the DesignMom blog but because of how I wanted to decorate the mugs I did deviate a little from the instructions. I went to Goodwill and purchased a few mugs. I had trouble finding 2 that were exactly alike but finally stumbled upon a few that I liked. Plus, you can’t beat $0.50 a piece! Then I went to a few craft-y stores and bought graphite transfer paper, some tape, and some scissors. My first deviation from the instructions provided by the DesignMom blog comes from the pens that I used. I bought a pack of the Pebeo Procelaine markers in black. Instead of using the fine point, I used the Bullet Tip marker for a slightly thicker stroke mark. I bought mine off of amazon because I couldn’t find the exact marker I wanted anywhere in town. I actually thought I was buying a single pen and ended up with a whole pack of them! (good day!) 🙂 The DesignMom blog used single letters to decorate the mugs (hence the name of the original project being monogram mugs)…but you can really do whatever you want. 🙂 I printed out the phrases, Mr. Right! and Mrs. Right! onto normal, printer paper using one of the primary fonts from our wedding stationary.
I had never used graphite transfer paper before but had absolutely no problems. I cut out a piece about the size of the writing that I wanted for the mugs. By taping the darker side to the mug and the printed writing on the outside, I could use the printed font as a guide. I used a normal pen, traced the printed words, and the transfer paper did the rest! The transfer paper left a graphite residue where I had traced over it with the pen.
Then I started using the procelaine pen. I traced over the graphite markings with the text and added some fun embellishments to each mug. I tried to make mine a bit more feminine and my husband’s a bit more masculine 🙂 I made some mistakes along the way but until the mugs are baked, you can use soap and water (and some scrubbing) to remove the marker.
Bake as recommended by DesignMom…
…and you’re done! Make sure to let them cool a bit when you take the mugs out of the oven…they will be quite hot! The mugs (after cooling haha) are ready for use! (and ready for dishwashing…which is a huge plus in my book)
Tips that I learned along the way:
1) Be careful with the pens…they are a little juicy and a little messy. I had to wash the paint off of my legs more than once because the pen had been hanging above my legs and had dripped a little 🙂
2) These pens come in multiple colors…that might be fun 🙂
3) Having a plan ahead of time about how you are going to decorate the mug is helpful
What do you think? The possibilities to take this project to the next level are really endless both in terms of decorating and in purposing the mug before giving it away. DesignMom gives some ideas for ways to use this great project for the important people in your life. Do you have any others? 🙂 Another huge plus for this project is that you can do it while sitting down 🙂 If you aren’t feeling well, this little project can take up the better part of an afternoon (especially if you are feeling ambitious with your decorating skills) but is also a calm and quiet activity. With some supervision, this activity would be great for the kids too! Let me know how your DIY decorated mugs turn out!


