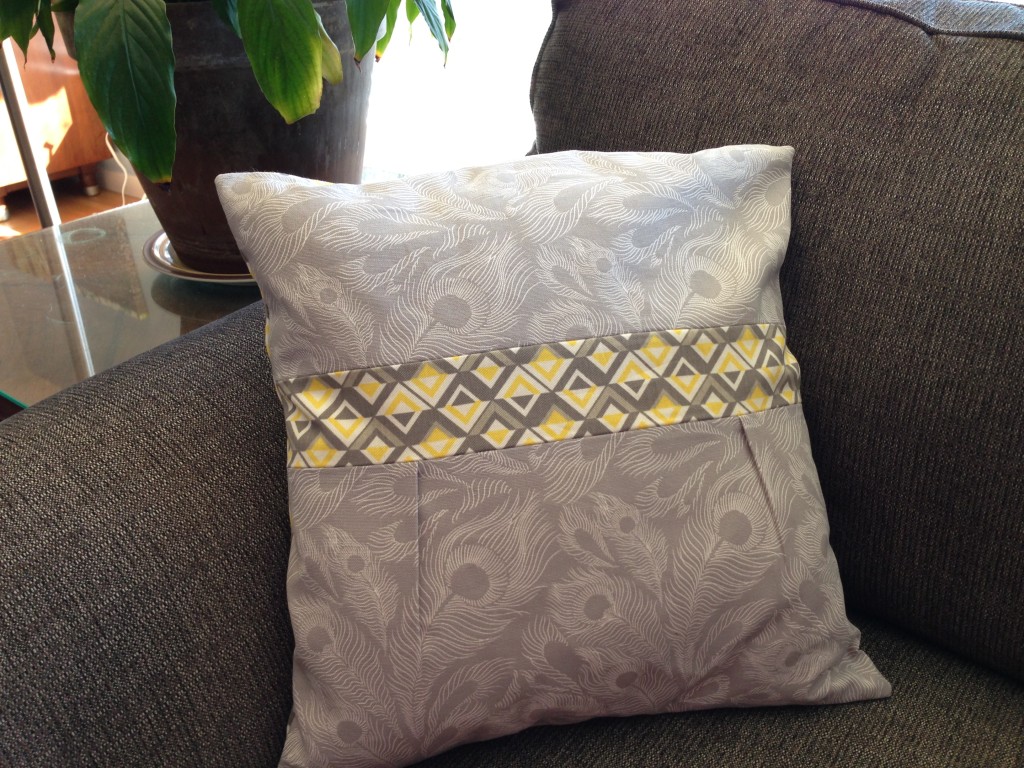
Interested in DIY throw pillows? These are so fun to make, super easy to customize, and are a great budget-friendly way to decorate your home. This project was SO much fun to do! It is perfect for those on a budget (like we are!) and also provides a calm, low-key activity when you might not be feeling well. If you have any slightly older kiddos, this project might be fun to do with them too! The pleated pillow case is also modern looking, and definitely adds character and style to a young adult house 🙂 You could definitely experiment with this project too…maybe add more pleats and create a bolder, pleated pattern?
My mother-in-law’s birthday was coming up, and being on a budget, my husband and I try to get creative when it comes to gifts. I saw a purse a little while ago that had this really pretty, pleated front, and I thought that I might be able to replicate that on a pillow! Having made DIY throw pillows case before, I knew the basics to creating the shell and installing the zipper so I thought I’d try and play around with a really lovely, pleated front.
I started with a 16″x16″ pillow form. You can buy these at most craft stores. I usually wait for there to be some sort of 40% off sale (seriously…you can find these all the time!) and then I buy a couple of them.
My husband and I picked out a couple of fabrics and I had a general idea of how I wanted to piece everything together. I ended up not using one of the fabrics at all but that is ok! I’ll use it another time!
Normally, I always start by washing, drying, and ironing my fabrics. This ensures that any shrinkage happens before you sew the finished product so that the end result stays the intended size. This time though, because I was using home decor fabrics, I did not wash or dry anything. Home decor fabrics are often treated with stain and wrinkle resistant things…I decided to leave the fabrics as stain resistant as possible. I did iron everything however.
The diagram below maps out some of the dimensions of my pillow front. You can play around with these measurements as much as you want! 🙂 I measured out a not-quite rectangular cut of the gray, feathered fabric. The height was 9″ while the top width was 19″ and the bottom 18″. I decided to create 1/2″ pleats in two different locations, 5.5″ from each edge of the bottom, gray fabric. After the pleats were in place, the bottom piece of gray fabric ended up being 9″x18″
In order to create the pleats, I measured 5.5″ in from one side, and made a small pencil mark. Then I measured 1/2″ in (towards the center of the fabric piece), made another small pencil mark, and folded the outer mark onto the inner mark. I pinned each pleat in place.
I then cut a 3″x18″ strip of my second fabric. I used a yellow/gray geometric pattern. I laid this second strip pretty side up on my table and placed the pleated, gray fabric pretty side down on on top of that strip. (Sandwich the pretty sides together). It is important to make sure that the pleated edge of the gray fabric is pinned to the top edge of the smaller strip of yellow/gray fabric. (I am going to keep referring to my fabrics based on color…you can definitely pick your own colors though!) 🙂
For the top section of the pillow, I used the same fabric as I had for the pleated section (like in the diagram near the top). You can use whatever fabric you want! (even a third one!) I cut a 6″x18″ piece of the gray, feathered fabric and placed it face down, on top of the free edge (not the edge already sewn to the bottom portion of gray fabric) of the pretty side of the middle strip of fabric (again, sandwich the pretty sides together). Then I pinned these two edges together and sewed. Next I ironed the seams open and voila, the front face of the pillow is done!
After finishing the front face of the pillow, I cut out the fabric for the back. I decided to use the same fabric for the back of the pillow as I had for the small, 3″x18″ strip (yellow/gray geometric). You can use whatever fabric you want. I had a third fabric that I had intended for the back but changed my mind 🙂
In my case, having a 16″x16″ pillow form, I cut out a 18″x18″ back and chose the yellow/gray, geometric patterned fabric that I had used for the middle stripe. You will now have a front piece of fabric (sewn together with pleats) and a back piece of fabric. Now we want to sew the zipper onto each piece. You’ll want a 14-16″ invisible zipper (mine here is a 12-14″ which wasn’t quite long enough…the store didn’t have a longer one and I didn’t want to wait, so I made it work) in a color that coordinates with the other colors used. I placed the front of my pillow face up on the table and pinned the zipper, face down to the top edge of the pillow face.
Then I placed the pillow back face up and pinned the free edge of the face down zipper in place.
I folded the two pillow sides (face and back) together with their pretty sides facing in and the zipper at the top. I pinned around the 3 open edges (the 4th edge has the zipper) and unzipped the zipper half way. I sewed around the 3 sides and trimmed the extra edges. Once I flipped the pillow form right-side out (through the opened zipper hole) the pillow case was done!….it just needed the pillow!
When I turned my pillow case right-side out, it was a tad big compared to my pillowform. To fix this, I turned it inside-out again. Unzipped the zipper half way, and sewed around the outside about 1/2″ in from my original seam. I trimmed the edges, flipped it back right-side out, and voila! 🙂


